Exporting Data for a Web Portal/Third Party
Specify supports the creation of a public web portal by using the Apache Solr search platform. Specify data can also be shared with third parties, such as GBIF, FIshnet, HarpNet, Mnis or OBIS. Both instances of data sharing require two steps to create an index file. First, the schema of the web portal/third party must be mapped to the Specify schema using the Schema Mapping Editor inside Specify. Next, the data file needs to be created and/or updated using the Data Exporter stand-alone application (found in the bin directory within the Specify application directory).
Creating a Web Portal using exported Specify data and Solr
Specify uses the indexing and search capabilities of Apache Solr to provide a full-featured web interface for public access to specimen data and images.
Creating a web portal using Specify data and Solr requires several steps:
- Apache Solr and a server must be installed on the computer that will be serving data to the internet.
- Create and Export a Schema Mapping file from within Specify.
- Use the Data Exporter, a separate Specify tool, to create a csv file containing the data.
- Integrate the exported web portal files with Solr
Each of these steps is explained in a web portal document accessible on the Specify Project website: specifysoftware.org.
Note: It is possible to combine several institutional collections in the same public Web Portal if each of the collections uses the same mapping file. The original mapping file must be exported and then idividually imported into each of the collections. See Import/Export a Mapping for more information.
Publishing Specify data through IPT
Specify takes advantage of the Global Biodiversity Information Facility's (GBIF) Integrated Publishing Toolkit (IPT) to publish Specify data to the web. IPT is an open-source, Java web application designed to publish biodiversity data on the Internet. The IPT creates an HTML web site on your web server and starts a network service that publishes your collection's data with the TAPIR data communications protocol. The third party web publisher can then be notified of the existence of your IPT server to make first contact and integrate your data into their cache. You will be assimilated. Specify no longer uses its own web interface software nor the DiGIR protocol for serving XML encoded data. See http://ipt.gbif.org for additional information regarding IPT.
Using the Integrated Publishing Toolkit to display and publish Specify collection data requires several steps.
- Install Tomcat on the computer that will be serving data to the internet.
- Map Specify data to a schema authority, such as Darwin Core, from inside Specify using the Schema Mapping tool.
- Use the Data Exporter, a separate Specify tool, to create (build) the data file for IPT.
- Setup IPT to display Specify data.
The current document explains how to define, or 'map', the Specify fields for data export. Please refer to the Data Exporter page for documentation about generating the export data file.
Schema Mapping Tool
The Schema Mapper is a powerful tool for organizing data that need to be exported. The schema mapping tool is used to create a query, referred to as a map, for exporting data from Specify to a web publishing platform, i.e. GBIF, or a Specify Web Portal. When publishing to a third party, such as GBIF, the map also creates relationships between the fields in Specify and the predefined field types and column headings that are required.
Open the Schema Mapping Tool by choosing System > Schema Mapper.
Two actions are available in the side bar:
- Create New Mapping
- Import Schema
Any existing mapping files are also listed on the side bar.
Import Schema
Schema refers to the many tables and fields that systematize the many dimensions and relationships of the data within biological collections. When preparing data in Specify to be published by a third party it is often necessary to use a predefined schema to ensure all necessary data files are included in the data export.
Specify ships with the following schema file preloaded in the Specify/Config directory:
- TDWG_DW_Core.xsd - Darwin Core 1.4 - draft standard under discussion (used in GBIF, and recommended to use in GBIF)
Note: earlier versions of Specify included other schema files that may also be available in the Import Schema tool.
- If a schema other than Darwin Core is desired, it must first be downloaded (preferably into the same Config directory) and saved into the file system as an .xsd definition file.
- Next, click Import Schema and choose the file from the resulting system dialog. The schema will be added to the list of predefined schemas available when using the Create New Mapping tool.
- The imported schema requires a Title and Version. The two entries will be joined, or concatenated, together and used to identify the schema mapping in the external tool. The concatenation will also be used for the name of the database table which holds the cache.
Three examples of predefined schemas that require importing into Specify are:
OBIS - http://www.iobis.org/obis/obis.xsd PaleoPortal - http://data.paleoportal.org/schema/conceptual/1.0/paleoportal.xsd ABCD - http://rs.tdwg.org/abcd/2.06/ABCD_2.06.xsd
Note: Currently all schema mappings are assumed to be specimen-based, i.e.: the elements described in the schema definition are assumed to refer to biological specimens. This means the mapping is based on a CollectionObject query by default.
To delete a schema from the available list (and your Specify/Config directory) right-click in the side bar (in an empty space), then choose Delete Schema in the resulting context menu. You may also delete the file directly from your Specify/Config directory.
Create New Mapping
Mapping files can be created by either choosing to edit a predefined schema or by selecting the desired fields from within Specify to create a custom mapping file.
Click Create New Mapping on the side bar. The resulting dialog lists the available predefined schemas and a no schema choice.
Create New Mapping from a Predefined Schema
Click Create New Mapping from the side bar, then choose a predefined schema from the list. A mapping editor opens with a list of Specify fields in the top section and a list of data types, referred to as Schema Concepts, in the bottom section.
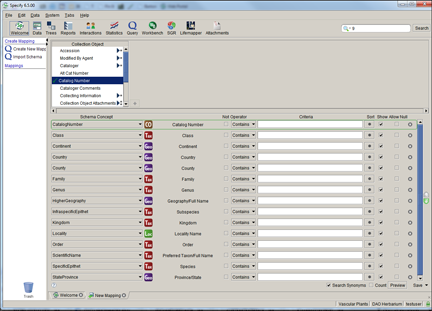
Specify automatically matches a Schema Concept from the predefined schema to a field in Specify.
Remap a term by simply clicking the list box (![]() ) and selecting a new schema concept from the list. Only unmapped schema concepts are available from the list.
) and selecting a new schema concept from the list. Only unmapped schema concepts are available from the list.
Add a term by selecting a field from the Specify list and clicking the ![]() button. The Schema Concept will be defined as 'Not Mapped'. Choose a schema Concept from the drop down list to map the new field.
button. The Schema Concept will be defined as 'Not Mapped'. Choose a schema Concept from the drop down list to map the new field.
Note: it is not necessary to include attachment fields in mappings, attachments are automatically included in mapping files.
Delete a term by selecting it from the list and clicking the ![]() (remove field) button.
(remove field) button.
Query Expressions can be used to narrow the results. These function similarly to the Query Builder. For additional help creating/editing query expressions please refer to the Query Builder help page.
Add Conditions to Eliminate Duplicate Records
IPT and Specify require that all uploaded records be unique. Due to the one-to-many relationships contained in Specify databases it may be necessary to add certain conditional fields to the schema to ensure this e.g. adding the Determination Current field and setting it to Yes will eliminate multiple determinations. One can also select a table to take advantage of the formatted and aggregated value for that table e.g. selecting the Collectors table will add all collectors on a single line. Fields can also be added to eliminate certain records from the resulting index.
Note: uncheck the Show checkbox to hide the schema concept in the exported data cache.
Create New Mapping by choosing Specify Fields
Click Create New Mapping from the side bar, then click 'no schema' from the list. A mapping editor opens with a list of Specify fields at the top of the work space. Fields are mapped to a schema concept, which represents the name included in the exported data cache. The schema concept can be edited by simply typing into the text box.
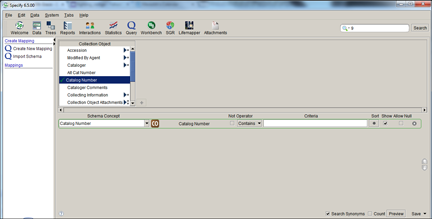
Add a term by selecting a field from the Specify list and clicking the ![]() button. The schema concept will match the name of the Specify field and can be edited by simply clicking in the text box and typing a new name for the term.
button. The schema concept will match the name of the Specify field and can be edited by simply clicking in the text box and typing a new name for the term.
Note: it is not necessary to include attachment fields in mappings, attachments are automatically included in mapping files.
Delete a term by selecting it from the list and clicking the ![]() (remove field) button.
(remove field) button.
Remap a term by simply clicking in the schema concept text box and typing a new name for the term.
Query Expressions can be used to narrow the results. These function similarly to the Query Builder. For additional help creating/editing query expressions please refer to the Query Builder help page.
Add Conditions to Eliminate Duplicate Records
IPT and Specify require that all uploaded records be unique. Due to the one-to-many relationships contained in Specify databases it may be necessary to add certain conditional fields to the schema to ensure this e.g. adding the Determination Current field and setting it to Yes will eliminate multiple determinations. One can also select a table to take advantage of the formatted and aggregated value for that table e.g. selecting the Collectors table will add all collectors on a single line. Fields can also be added to eliminate certain records from the resulting index.
Note: uncheck the Show checkbox to hide the schema concept in the exported data cache.
Check a Schema Mapping
- Click the Preview button in the lower right corner to display a 120 record sample of the mapping in a query results display. If your data contains duplicate records, you will be alerted and will need to correct this problem by adding conditions to the query before continuing. Once successful, Specify will display a dialog message asking you to use the external tool to export the data.
- If all the mappings are correct, save the schema mapping by clicking the Save button. Name the mapping in the resulting dialog. The mapping will be saved as an xml file.
The new mapping will be listed on the side bar.
Edit a Schema Mapping
Click a mapping on the side bar to open it in the mapping editor. The schema concept in the resulting editor will display differently dependent upon the way in which the mapping file was created. Mapping files created from a predefined schema will include a list of all available field types for the schema concept. Mapping files created by choosing fields within Specify will include an editable text box for the schema concept.
Note: Whenever a schema mapping is edited, a full rebuild of its cache (in the separate Schema Exporter tool) will be required.
Import/Export a Mapping
Import
- Right-click in the side bar (in an empty space), then choose Import Mappings in the resulting context menu.
- Choose the file to import from the resulting file menu dialog
Note: When importing mappings that have the same name as existing queries, Specify will simply add a number (2) to the import query name.
Export
- Right-click in the side bar (in an empty space), then choose Export Mappings in the resulting context menu.
- If multiple mappings are available a dialog will appear to choose the desired mapping to export.
- Name the file and choose a storage location for the file in the resulting file menu dialog, then click the Save button.
Delete a Mapping
Right-click on the side bar (in an empty space) then choose Delete Schema or drag and drop a mapping onto the Trash Can in the side bar to delete it
Note: Mappings that are deleted from within Specify will no longer be available for data file updates in the Data Exporter tool.
To generate the Data file see the documentation page Data Exporter.