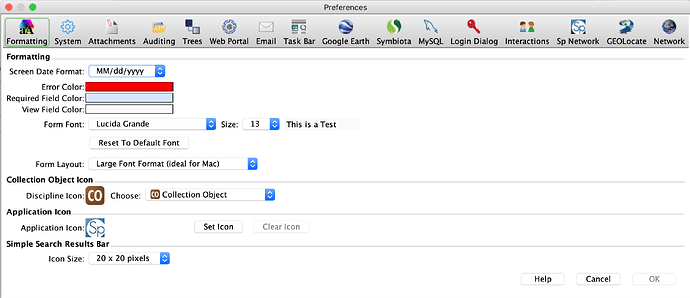
 Formatting Preferences
- For Mac: Choose Specify > Preferences > Formatting.
- For Windows and Linux: Choose Edit > Preferences > Formatting.
Formatting Preference
Formatting allows the customization of display information. Changes made in the Formatting Preferences will display immediately on the side bar and task bar but will not automatically update within the work space. The changes will display in new work space windows.
|
Formatting Preference |
Result |
Note |
Action |
|
Screen Date Format |
This will set the date format for all date fields on all forms. | Changes to the date format may require that Specify be shutdown and reopened to appear in the word space. | Choose a format from the drop down menu. |
|
Error Color |
Fields with incorrect or incomplete data will be designated with this color. Specify also puts a colored box around formatted text boxes when information is incorrectly entered. |
Click the Error Color rectangle and select a new color from the resulting tile box. Click anywhere outside the color tile box to cancel it. |
|
|
Required Field Color |
Required Fields within a form must be complete before Specify will allow the information to be saved. These fields are designated with a color. Specify defaults to blue. |
Required Fields within a form must be complete before Specify will allow the information to be saved. These fields are designated with a color. Specify defaults to blue. |
Click the Required Field Color rectangle and select a new color from the resulting tile box. Click anywhere outside the color tile box to cancel it. |
|
View Field Color |
A View Field is one that is filled in automatically and can not be edited. Specify defaults to a white text box for the View Fields. When forms are in View mode all fields are View Fields and will be this color. |
When forms are in View mode all fields are View Fields and will be this color. |
Click the View Field Color rectangle and select a new color from the resulting tile box. Click anywhere outside the color tile box to cancel it. |
|
Form Font |
Required fields are programmed within Specify to display with a bold label. If the Form Font is changed to a font that does not support bold then required fields will not be displayed with a bold label. | Select a font from the list box. Font choices are based on the local system fonts. | |
| Form Layout | Forms have been created with varying layouts on the Mac, PC and Linux operating systems. The small, medium and large fonts are static pages that do not expand for larger screens. The 'Elastic Layout' will expand to accommodate larger screens or manual changes in font sizes. | The 'Small Font' is recommended for use on Windows, the 'Medium Font' is recommended for use on Linux and the 'Large Font' is recommended for use on Macintosh machines. | Choose a format style from the list. |
|
Size |
The new font and size will display as 'This is a Test' in the text box next to the Font Size list box. The new font size will be reflected in any new sub panes that are opened in the Workspace only, not on the Sidebar list or Taskbar menus. |
|
Select a font size from the list box. |
|
Reset Default Font |
Resets the font and font size to Specify default settings. | Click the button. | |
|
Discipline Icon |
The icon used to signify the discipline and Collection Object will change. These icons are used in a variety of Specify modules such as Permissions, forms, Queries and Simple Search. | Choose an icon from the predefined set of discipline specific icons. | |
|
Application Icon |
Specify only accepts jpg, png and gif image formats. The recommended size for the icon is 32 x 32 at a resolution of 72 dpi. Click the Clear Icon button to reset the Application Icon back to the Specify 6 icon. The Application Icon appears on the Task Bar and a variety of Specify dialogs. |
|
Choose the Set Icon button, then select an image file from the resulting file system dialog. Choose the Clear button to default back to the Specify icon. |
| Results Bar Banner | Creating a Query or Simple Search, or viewing a Record Set will produce a colored results bar and list of records. The size of the colored results bar will increase vertically with a larger pixel size and decrease vertically with a smaller pixel size. | Click on the Combo Box and choose a pixel size from the list. |
