 Specify Setup Wizard
The Specify Setup Wizard is required to customize and create a Specify database in MariaDB. The Wizard walks you through the creation of a database including; the insertion of a schema in MariaDB, and the initialization of the Specify database structure. The Specify Wizard also enables you to download authority files for Taxa (for some disciplines) and for Geography, as starting points for building and customizing your taxon and geography data.
Before running the Specify Setup Wizard, MariaDB, must have been previously installed on either the workstation on which Specify will be run, or on a shared network server computer for access from two or more workstations. User accounts must also exist within MariaDB with the necessary permissions for Specify to communicate with the data manager. The creation of these accounts varies depending on your Specify setup.
Standalone Specify installation on a workstation – not accessed by other workstations
The documents Installing MariaDB on MacOS X for Specify and Installing MariaDB on Windows for Specify give step-by-step instructions for installing MariaDB on both a Macintosh and Windows computer (respectively) and setting permissions for the MariaDB ‘root’ user account. The ‘root’ user is referred to as the Specify ‘IT User’ in Specify documentation. This account allows the Specify Wizard to access MariaDB during the Specify setup process. You will need to enter the name ‘root’ and the password to run the Wizard.
Once the MariaDB installation process is complete you may run the Specify Wizard. Step-by-Step instructions for running the Specify Wizard are included in the section of this document titled "Running the Specify Setup Wizard".
The same Workstation running Specify and MariaDB, and accessed by other Workstations
The documents Installing MariaDB on MacOS X for Specify and Installing MariaDB on Windows for Specify give step-by-step instructions for installing MariaDB on both a Macintosh and Windows computer (respectively) and setting permissions for the MariaDB ‘root’ user account. The ‘root’ user is referred to as the ‘Specify IT User’ in Specify documentation. This account allows the Specify Wizard to access MariaDB during the Specify setup process. You will need to enter the name ‘root’ and the password to run the Wizard.
Two additional steps need to be completed to allow other workstations to access your Specify database before running the Specify Wizard:
- Edit your my.ini file on Windows, or your my.cnf on Linux and MacOS X, to include your local IP as the Bind-address.
- Create a ‘Master User’ within MariaDB. The key points for creating this MariaDB user are (1) to grant the necessary privileges on a designated Specify database and (2) to give the MariaDB user account access to the database based on IP address range values.
Instructions for these tasks can be found in the document Setting up a Workstation as a Specify Database Server, which is available on the specify website.
Once these steps are complete, you may run the Specify Wizard to create a new database. Step-by-Step instructions for running the Specify Wizard are in the next section of this document. When running the Specify Setup Wizard, in the first Wizard window enter ‘root’ as the IT Username, and the password that you created. Then enter the dedicated database name chosen during the Master User creation, and the Hostname (network name of the computer running MariaDB), then click on Create Specify Database.
This will initiate the process of creating Specify’s database tables and may take several minutes to complete.
Note: if you click on the Test IT Login button, and if the login is successful, the Wizard will continue to the next screen. Before proceeding though, you must immediately use the Back button to return to the Database Information window, and click on the Create Specify Database button, otherwise your Specify database tables will not be created and the Specify Wizard will eventually fail.In the subsequent Wizard window, which asks you for the Master account information, enter the master username and password that were created earlier in MariaDB, and then click the Test Master Login button. This should return a message that your Master Login is correct, then you can proceed with the Wizard screens. If your Master account credentials do not allow you to login to the MariaDB server, check your credentials for a misspelling.
Do NOT click on the Create Master User button on this window, as that will re-create your Specify master user account with MariaDB access permissions restricted only to the workstation on which you are running the Specify Wizard. This will prevent other workstations from accessing your Specify database.
Step-by-Step instructions for running the Specify Wizard are included in the section of this document titled "Running the Specify Setup Wizard".
A dedicated MariaDB server computer with access from multiple workstations
Two steps must be completed before running the Specify Wizard:
- Create a Specify IT User in MariaDB. This includes granting privileges on a named database and allowing access to the database based on IP address range values.
- Create a Specify Master User in MariaDB. This includes granting privileges on a named database and allowing access to the database based on IP address range values.
Specify requires access to MariaDB through either a ‘root’ account, or other user account, which has been granted all necessary permissions. Often, for shared MariaDB servers managed for organizations, e.g. across departments or campuses for multiple databases (not just Specify), the root user account information is typically protected by database or network administrators and will not be available to complete the Specify database creation with the Specify Wizard. In those cases, the database or network administrator must first create two new users with specific privileges for a new database creation, and name the database -- before the Specify Wizard can be run. These user accounts and their passwords must be communicated to you, along with the name used for the database, before proceeding with the Specify Wizard. We provide simple MariaDB scripts in the document Setting Up Specify to Use a Networked MariaDB Server, available on the Specify Software web site, to enable MariaDB server administrators to create the new users for a Specify database, and assign privileges to those users on a shared MariaDB server computer. In documentation we refer to the root-level user for the Specify database as the "Specify IT User". The other user is referred to as a “Specify Master User”. The Specify (thick) client application does not need to be installed on the MariaDB server. The Specify Setup Wizard can be run from the server, but we recommend that it be operated on a networked workstation.
When running the Specify Setup Wizard, in the first Wizard window enter the information for the new database: IT User name, IT User Password, Database name, and Hostname (network name of the computer running MariaDB), then click on Create Database.
This will initiate the process of creating Specify’s database tables and may take several minutes to complete.
Note: if you click on the Test IT Login button, and if the login is successful, the Wizard will continue to the next screen. Before proceeding though, you must immediately use the Back button to return to the Database Information window, and click on the Create Specify Database button, otherwise your Specify database tables will not be created and the Specify Wizard will eventually fail.In the subsequent Wizard window, which asks you for the Master account information, enter the master username and password that were created earlier in MariaDB, and then click the Test Master Login button. This should return a message that your Master Login has worked and then you can proceed with the Wizard screens. If your Master account credentials do not allow you to login to the MariaDB server, check your credentials for a misspelling.
Do NOT click on the Create Master User button on this window, as that will re-create your Specify master user account with MariaDB access permissions restricted only to the workstation on which you are running the Specify Wizard. This will prevent other workstations from accessing your Specify database.
If Specify will be installed on a network server and run on several computers, the Setup Wizard should only be run once, from a single workstation, to setup the database on the network server. Do not re-run the Setup Wizard on other desktop computers when using a shared MariaDB server. It creates a new, blank database and will permanently erase all existing data. Once the Wizard is run and completed on a single workstation to setup a Specify database, it is not needed again.
Running the Specify Setup Wizard
Database Information

Enter MariaDB IT Username and Password
The first window allows you to either create a Specify database or verify that Specify can access a database you have already created within MariaDB. To create or verify a database, you must first complete the following information:
- The IT Username and IT Password must be an existing account with the necessary privileges in the MariaDB database manager. This account will be used by the Specify Setup Wizard to create your Specify database and a Specify Master account (in the next window) in MariaDB. If you do not know the IT administrator account username and password for MariaDB, or do not have a MariaDB installation, exit now. You can not go further without these.
- The Database Name will be used to name the database that the Setup Wizard is about to create. If you will be running Specify on a single workstation and will not grant access to the Specify database to other workstations, you are creating this name as you type it into the window. Once you name the database make sure to document it so you can reference it at a later date.
If you will be allowing other workstations to access your Specify database, a name has been previously identified for the database, and the IT/Master User have been given permission to access MariaDB and create the database. You must type in the designated database name. If you have not identified a name for your database and granted the IT and/or Master User permission to access it, you may not proceed and must click Cancel to exit the Setup Wizard. More information about this step can be found in the introductory section of this help document.
- The Host Name is the name of the computer that is running MariaDB. This is either an IP Address or name of the computer that is recognized by the server. When running MariaDB on your local machine this is almost always 'localhost' or '127.0.0.1'.
Note: When using an IP Address make sure that the IP is 'static'.
- Database Structure Creation Only should not be checked unless you have received a conversion database from the Specify team and specific instructions to check this box.
Click the Create Specify Database button and allow the Specify Setup Wizard to connect to MariaDB using the information you have entered, create your Specify database, and insert the Specify schema. This process must be completed before proceeding to the next steps of the Setup Wizard.
If Specify can not connect to MariaDB and build the database for any reason an error message will display. To proceed with the Wizard you will need to verify that the information entered and your MariaDB setup are correct.
Advanced: Test IT LoginThis procedure is very rare and should only be used when specifically instructed by the Specify Help
Note: if you click on the “Test IT Login” button, and if the login is successful, you will automatically proceed to the next Wizard screen. Before proceeding though, you must immediately use the “Back” button to return to the Database Information window, and click on the Create Specify Database button, otherwise your Specify database tables will not be created and the Specify Wizard will eventually fail.
Specify Master Credentials

Create a Master Username and Password
This window either creates the Master username and password for your Specify system, or verifies that a Master username and password that has already been created within MariaDB is recognized by Specify. Any instance of Specify that allows access from other workstations must create the Master username and password using the MariaDB Admin tool. More information about this step can be found in the introductory section of this help document.
The security system for Specify 6 uses both a "Master" username and password, and a User username and password. Specify uses the Master username and password to access the MariaDB Database, and the User username and password to grant permission to run the Specify program. The Master account has SELECT, INSERT, UPDATE, DELETE and TABLE LOCK privileges on data tables in your Specify database only and has no other MariaDB privileges. Specify uses only one Master username and password for all users, but encrypts the Master information with the User information, creating an encrypted string. This allows the Master information to become unique for each user.
Create the Master
If you are using Specify on a single workstation that has not been configured to grant access to other workstations, you will use this screen to create the Master username and password. Click the Create Master User button. Specify will take a moment to create the Master account in the database. Once this account has been created you may not change the information on this screen, or any previous screens.
When creating the Master username and password, the word "Master" or "Root" SHOULD NOT BE USED. Please create a unique Master username and a secure, strong password for it. This should not be the same as the username and password used for the MariaDB IT account in the previous window. This information should be remembered and secured by the person installing MariaDB and Specify at your institution. The Specify administrator, (a role and account within Specify), will need the Master username and password to create new user accounts in Specify.
Advanced: Test the Master
If you will be allowing other workstations to access your Specify database you must first create the Specify Master User in MariaDB, grant it the necessary permissions and allow it access to the Specify database by setting an IP address range. If you have completed this step and created a Master User, enter the name and password and click the Test Master Login button. If you have not created the Master within MariaDB you may not proceed and must click Cancel to exit the Setup Wizard. More information about this step can be found in the introductory section of this document.
Do NOT click on the Create Master User button on this window, as that will re-create your Master user account with MariaDB access permissions restricted only to the workstation on which you are running the Specify Wizard. This will prevent other workstations from accessing your Specify database.
Security

Turn Security On/Off
Specify Security refers to the set of permissions and entitlements within Specify which gives users the rights to see certain data and to use particular functions. If your Specify database will never have more than one user, (you), then Security (i.e. permissions within Specify), can be turned off. This will give you total access to all Specify program functions and data. Specify will not check your credentials or limit your access to data or Specify components.
If you will be creating multiple users within Specify it is recommended that you turn security on.
Security can be turned on or off inside the Specify application.
Manager

Create Specify Manager / Administrator
This account is the first Specify user account for your database, and is created at the level of Manager, the highest level in the Specify permission model. The account usually represents the primary user, or administrator, of your collection database. An Administrator account will also be created within Specify using this information. It is this username and password that will be used to login to Specify for the first time, once this Setup Wizard is finished. At that time additional users can be added within Specify.
Protect the username and make the password strong. This Specify manager level information will also be used to create a record in the Specify database for an ‘Agent’ representing the same person.
Institution

Create Institution and Enter Information
The Specify data management levels mimic the common levels of hierarchy within institutions. Access to information and Specify tools are then set at the various levels both within the application and through the User Permissions.
The Setup Wizard creates a single entry for each level of the hierarchy (Institution, Division, Discipline and Collection). This setup window is the first step in that process. Each of the fields on the screen must be completed before the Next button will become enabled.
- The Name should be the formal name for your institution. It is a field within the Specify database, is displayed on the Institution form, and can be queried and used in reports.
- The Code is typically an acronym, codon, abbreviation or short name for your institution (not your collection), if you don't know of one, put in a placeholder, this can be edited at a later date. Institution codes are often required for web services such as DiGIR/TAPIR.
- The Institution Address information, such as City, State, Country, Zip Code and Phone Number, is also added to fields within the Specify database, displayed on the Institution form, and can be queried and used in reports.
Accessions

Choose Accession Level
Accessioning is the formal process by which a specimen or object is legally accepted and recorded as a museum item and differs from cataloging. Some museums and herbaria have a formal accessioning process, some do not. If your institution does not use the concept of accessions (typically handled by a registrar or administrative curator), then leave this item unchecked and simply click the Next button to proceed to the next window.
For organizations that do recognize accessions, the process usually entails documenting proof of ownership (in the form of a signed deed of gift), and that the material was legally acquired (in the form of all associated permits - collecting, import and export). An accession usually covers an entire field trip and multiple catalog items could be included within a single accession. For the institutions that use it, accessioning and its associated numbering system is usually set up as a standard museum-wide process, backed by policy.
The accession numbering scheme or sequence can either be recorded at an Institution level for all collections (Globally) or at a Division level. The way to do this within Specify is based on whether your institution has staff which manage all accession transactions for your institution, like a Registrar, or if accessions and accession numbers will be managed and assigned within one or more separate Divisions within the Institution. Again, if you do not use accessions, this choice can be ignored. Assigning accessions to be managed "globally" across the entire organization will ensure that accession numbers and records are unique across all collections for the entire institution.
Note: If you choose to manage your accessions globally you will be presented with the following window to choose a format. If you did not choose to manage your Accessions globally you will be presented with the window later in the Wizard process when you create a Collection.
Accession Number Format

Create Accession Number Format
Accession Numbers may require a format or may simply use a number. Choose None to leave the Accession Number as a text field on the Accession form. Accession Number formats are not editable once data has been entered into this table in the database.
-
Format offers several choices in the drop-down menu list:
None is the default setting, which is a 60 character string field.
Create allows you to create your own format. Choosing Create will open the Field Formatting Editor. Click HERE for the Field Formatting Editor help page.
Accession Number (2020-AA-###) The year will appear automatically in the first section (2020) of the format, and can be manually edited. The 'AA' section of the format is alphanumeric and accepts both characters a through z and numbers. The ### section of the format is a number that is automatically incremented when Auto Numbering is turned on in Specify and manually entered when Auto Numbering is turned off. This format offers two alphanumeric characters and three incremented numbers.
AccessionNumberByYear (2020-AA-AAA) The year will appear automatically in the first section (2020) of the format, and can also be manually edited. The 'A' sections of the format are alphanumeric and accept both characters a through z and numbers. This format offers two alphanumeric sections, the first is two characters in length and the second is three characters in length.
AccessionStringFormatter (AAAAAA) This is a single alphanumeric format that accepts characters a through z and numbers. The Accession number would be seven characters in length.
- Pattern displays the pattern used to create each format (these are explained in further detail above).
- Is Auto Incremented displays a 'yes' if the selected format is automatically incremented.
Storage Tree

Configure the Storage Tree
Specify 6 visually presents some data types in hierarchical tree displays. These data types include the Taxon, Geography, (Specimen) Storage, Chronostratigraphy and Lithostratigraphy tables. Each tree is visually displayed as hierarchical levels. The Levels must first be defined in a tree definition, then nodes can be added. The Setup Wizard offers a table for each of the trees (Chronostratigraphy and Lithostratigraphy for paleo collections only) for creating tree definitions, or levels. These can also be edited at a later date from within Specify.
Nodes for the Storage tree can be added within the Specify application. The storage tree operates at the Institution level and is available and visible to all Collections. Therefore, it is important to include the necessary levels for all collections.
- The Level column displays the available levels. This name can be edited from within Specify. Click the Include box to place the level in the tree.
- Include places the Level in the tree definition. Levels that are not included can not be Enforced or added to the Full Name.
- Is Required is not editable, but an indication of the tree levels that are used by Specify as a system requirement. These are automatically added to the tree and can not be deleted on this screen or later from within Specify.
- Is Enforced ensures that the level can not be skipped when adding nodes at lower levels down the tree. Levels that are Required by the system are also Enforced by the system and can not be edited.
- Is in Full Name includes the level when building a full name expression, which can be queried and used in reports. Create the full name by checking the desired boxes. This is the string that will be displayed in the storage field in the preparation table. At least one level for Full Name must be checked before the Next button will become enabled.
- Separator refers to the character that separates the levels when displaying the full name. This can be any single character, such as a comma (,) or a space. To make the separator a space simply double click inside the column and delete the comma, then press your spacebar once.
- Full Name Order will reverse the full name as shown in the Full Name Example.
Create Institution

Create Institution and the Administrator
Click the Create Institution button to create your institution and add you as Administrator in your Specify database. Once this information has been created you may not change it on any of the previous screens and the Back button will become disabled.
The Institution must be created before the Next button will become enabled.
Division

Create a Division
This window is used to create a single Division within your institutional hierarchy. Additional divisions can be added later from within Specify.
- The Name will appear on the division form and can be queried and used in reports. A division is used to collectively name similar collections e.g. the Division of Peleontology may include Vertebrate Paleontology, Invertebrate Peleontology and Peleobotany collections. The Name is a field within the Specify database and is displayed on the Institution form. It can be edited, queried and used in reports.
- The Code can be a short name, acronym, codon or abbreviation. If your Division does not have a Code, put in a placeholder, this can be edited at a later date. Division codes are sometimes required for web services.
Discipline

Choose a Discipline Type
- Choose a taxonomic Discipline Type from the drop-down menu. Specify uses this information to load the correct default data entry forms, trees and schema (tables and fields) based on the predefined disciplines within Specify. If your discipline type does not appear in the list, choose the closest discipline to yours based on taxonomic qualities.
- The Name is pre-filled with the discipline type name but can be any user specific variation of the Discipline Type. It can be edited, queried and used in reports. Additional Disciplines can be added from within Specify.
Taxon Tree

Configure the Taxon Tree
This table will create the tree definition for the Taxon tree. The Taxon tree operates at the Discipline level and will be used by all Collections within the Discipline you created in the last window. Nodes to the Taxon tree can be added later from within Specify.
- The Level column displays the available levels. This name can be edited from within Specify. Click the Include box to place the Level in the tree.
- Include places the Level in the tree definition. Levels that are not included can not be Enforced or added to the Full Name.
- Is Required is not editable, but an indication of the tree Levels that are used by Specify as a system requirement. These are automatically added to the tree and can not be deleted on this screen or later.
- Is Enforced ensures that the Level can not be skipped when adding nodes lower down the tree.
- Is in Full Name includes the level when building a full name expression for any associated Collection Objects (which appears in the Taxon Full Name field of the taxon table). The Full Name is also displayed in the Preferred Taxon field on the Determinations form and is useful when running queries and reports when the full name is desired. The full name generally includes at least the binomial Genus and Species fields together with any levels below species (if used). Create the full name by checking the desired boxes. At least one level for Full Name must be checked before the Next button will become enabled.
- Separator refers to the character that separates the levels when displaying the full name. This can be any single character, such as a comma (,) or a space. To make the separator a space simply double click inside the column and delete the comma, then press your spacebar one time.
- Full Name Order will reverse the full name as shown in the Full Name Example.
Taxon Authority File
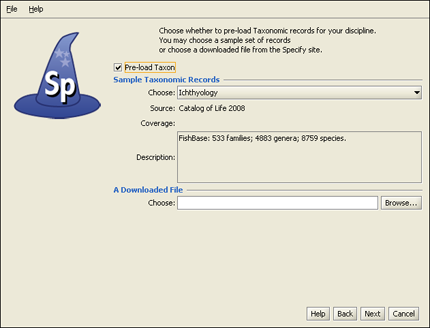
Preload Taxon Records/Nodes
The Specify Wizard not only defines the Taxon tree but also allows pre-loading of an authority file for the discipline you are creating. Authority files were created using data from the Catalog of Life Project for some of the disciplines within Specify. If this window does not appear, there are no existing authority files for your chosen discipline.
If you choose to load the data into your tree the Taxon tree will be populated with hundreds of taxon nodes and all associated data. Then, when adding Collection Objects into your database you can simply choose a taxon from the Taxon field rather than adding each individually as needed.
Please note that loading the Taxon tree will also affect the tree definition. If you load the provided Taxon authority file for your discipline the accompanying tree definition may include Levels that were not defined by you in the previous window, but are necessary to include all the predefined Taxon information.
Additional discipline-specific trees can be loaded from within Specify at the time new disciplines are created.
- Click the Choose button for a list of taxon files for the discipline you are creating. Not all disciplines offer more than one taxon file. Once the taxon file is chosen, information will display in the Source, Coverage and Description fields for that file.
Note: Botany and Entomology authority files represent partial trees due to the size of these files.
- The Downloadable File section in this window allows you to choose taxon files from your hard drive. The Setup Wizard can only install files that were downloaded from the Specify website. The Specify team is currently in the process of creating more of these files.
Geography Tree

Configure and Load Geography Tree
The Geography tree operates at the Discipline level and is used by all Collections within the Discipline. Nodes to the Geography tree can be added later in the Wizard as well as from within Specify.
- The Level column displays the available levels. This name can be edited from within Specify. Click the Include box to place the level in the tree.
- Include places the Level in the tree definition. Levels that are not included can not be Enforced or added to the Full Name.
- Is Required is not editable, but an indication of the tree levels that are used by Specify as a system requirement. These are automatically added to the tree and can not be deleted on this screen or later.
- Is Enforced ensures that the level can not be skipped when adding nodes lower down the tree.
- Is in Full Name includes the level when building a full name expression, which can be queried and used in reports. Create the full name by checking the desired boxes. At least one level for Full Name must be checked before the Next button will become enabled.
- Separator refers to the character that separates the levels when displaying the full name. This can be any single character, such as a comma (,) or a space. To make the separator a space simply double click inside the column and delete the comma, then press your spacebar one time.
- Full Name Order will reverse the full name as shown in the Full Name Example.
The Wizard will automatically load data for the Geography tree, including Continents, Countries, and States throughout the world as well as Counties within the United States. Data for the Geography tree was converted from the online website Geonames.org.
Collection

Create a Collection
Enter the Name and internationally recognized Collection Code to create a single Collection within the Discipline. This is the name that will appear within Specify on the Collection form and can be queried and used in reports.
The Code should be your standard collections community assigned code for your collection. This Code will be used in data exports and web interfaces in upcoming releases of Specify.
Additional collections can be added from within Specify.
Catalog Number Format

Create a Catalog Number Format
Specify is able to accept data for collection objects or observations without assigning a Catalog Number. But when Catalog Numbers are used, they must be unique for each lot, specimen or observation. Most collections routinely assign catalog numbers to incoming materials, perhaps as part of the accessioning process. These numbers may require a format with specific sections for data such as Institution Code and year or they may simply use an incrementing number.
Catalog Numbers can either be unique to each Collection, shared by several collections or used throughout the Institution. The Catalog Number chosen at this time will not affect where it is used relative to other collections, this will be configured from within the Specify application. The Catalog Number format for this collection can not be edited once it is chosen.
Several formats are available from the drop-down menu list:
-
Format offers several choices in the drop-down menu list:
None is the default setting, which is a 60 character string field.
Create allows you to create your own format. Choosing Create will open the Field Formatting Editor. Click HERE for the Field Formatting Editor help page.
CatalogNumber (2020-######) The year will appear automatically in the first section (2020) of the format, and can also be manually edited inside Specify. The '###' section of the format is a number that is six digits in length. This section can be automatically incremented when Auto Numbering is turned on in Specify or manually entered when Auto Numbering is turned off. These two sections are separated by a dash.
CatalogNumberAlphaNumByYear (2020-######) The year will appear automatically in the first section (2020) of the format, and can also be manually edited from within Specify. The '###' section of the format is a number that is six digits in length. This section can be automatically incremented when Auto Numbering is turned on in Specify or manually entered when Auto Numbering is turned off. These two sections are separated by a dash.
CatalogNumberNumeric (#########) This is a nine digit number that is automatically incremented when Auto Numbering is turned on in Specify or manually entered when Auto Numbering is turned off.
CatalogNumberString (XXXXXXXXXX) This is a ten digit string that can include numbers, alphabet or characters
- Is Numeric will display a 'yes' if the selected format is numeric.
- Pattern displays the pattern used to create each format (these are explained in further detail above).
- Is Auto Incremented displays a 'yes' if the selected format is automatically incremented.
Collections that do not use one specific format for their Catalog Number may wish to choose CatalogNumberString from the list, this will allow any format to be entered.
Accession Number Format
Create an Accession Number Format
Note: If you chose to manage your Accessions globally you will have already chosen a format for your accession number and will not be presented with this window again.
Accession Numbers may require a format or may simply use a number. Choose None to leave the Accession Number as a text field on the Accession form. Accession Number formats are not editable once data has been entered in the database.
-
Format offers several choices in the drop-down menu list:
None is the default setting, which is a 60 character string field.
Create allows you to create your own format. Choosing Create will open the Field Formatting Editor. Click HERE for the Field Formatting Editor help page.
Accession Number (2020-AA-###) The year will appear automatically in the first section (2020) of the format, and can also be manually edited. The 'AA' section of the format is alphanumeric and accepts both characters a through z and numbers. The ### section of the format is a number that is automatically incremented when Auto Numbering is turned on in Specify and manually entered when Auto Numbering is turned off. This format offers two alphanumeric characters and three incremented numbers.
AccessionNumberByYear (2020-AA-AAA) The year will appear automatically in the first section (2020) of the format, and can also be manually edited. The 'A' sections of the format are alphanumeric and accept both characters a through z and numbers. This format offers two alphanumeric sections, the first is two characters in length and the second is three characters in length.
AccessionStringFormatter (AAAAAA) This is a single alphanumeric format that accepts characters a through z and numbers. The Accession number would be seven characters in length.
- Pattern displays the pattern used to create each format (these are explained in further detail above)
- Is Auto Incremented displays a 'yes' if the format is automatically incremented.
Summary

Summary Window
Congratulations! You have finished the Specify Setup Wizard. This last screen displays all the data that has been created using the information provided in the preceding windows. If edits are required simply click the Back button until the desired window displays and re-enter the information.
Click the Build Database button to create a blank database with all the necessary components to begin using your collection. Then, select the Specify application from your menus and login with your newly created username and password.