Create Data Set from Record Set
In Specify 6, one can create a WorkBench Data Set based on an existing Specify Record Set. The Data Set can then be exported as an Excel spreadsheet and imported into other Specify databases.
Before a record set can be converted to a data set a mapping must exist. You can reuse an existing data set mapping. If a data set with a duplicate mapping does not exist then a mapping must be created by also creating an empty data set.
Create a Mapping/Data Set
- Click the
 New Data Set button on the side bar.
 - Click the Create new Data Set mapping button
To choose column headings for the new data set, select the Create new Data Set mapping button and click the OK button. The Data Set Mapping Editor will appear:
Data Set Mapping Editor
The Data Set Mapping Editor allows columns to be mapped, unmapped and reordered using the following buttons:
- Add column headings

New Data Set

| Map | Adds the field to the column list. | |
| Unmap | Removes the field from the list of columns. | |
| Reorder up | Moves the selected field up. | |
| Reorder down | Moves the selected field down. |
The WorkBench provides a list of fields matching the Specify data model to use as column headings in the new data set. The list is organized by Data Types, sometimes referred to as Tables.
1) Select a Data Type. The available fields will appear in the 'Specify Fields' window.
2) Select a field.
3) Click the ![]() (map) button.
(map) button.
The new column heading will appear under both 'Specify Fields' and 'Data Set Columns' (as shown below).
A link icon, (![]() ), confirms that the Specify field is mapped to the Data Set column.
), confirms that the Specify field is mapped to the Data Set column.
Note: A field may only map once. Specify fields that are mapped display a green check mark next to their name in the Specify field list confirming that they are in use.
Note: When importing Taxon information only use the Taxon Only Table in the mapping editor.
Note: The Agent table in the mapping editor may only be used for agent information. When uploading agent information associated with other tables use the appropriate table such as Cataloger, Determiner or Collector and their respective fields.
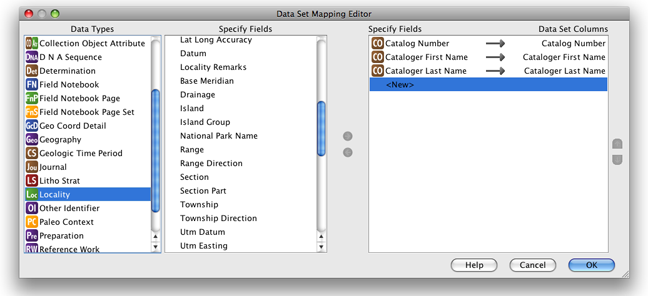
Data Set Mapping Editor with three columns added
Continue adding fields/columns until the 'Data Set Columns' list is complete, then click 'OK'.
Complete the new Data Set/Mapping by naming and describing it:

Data Set Properties
Create a Data Set from a Record Set
- Click the Create Data Set from Record Set button
- Choose a record set from the dialog and click the OK button
The next dialog lists the available data sets.
Note: If a Mapping does not exist the process will stop and nothing more will happen.
- Choose the data set/mapping that you require.
- Click the OK button.
In the next dialog name the new data set.
Note: Data contained in all records in the record set will be used to fill the data set columns. Where necessary all data in one-to-many relationships will be inserted into the relevant fields. It is important to include these necessary fields in the original mapping. E.g. if the records in the record set all have two collectors it is important to include columns for Collector 1 First Name, Last Name and Middle Initial as well as Collector 2 First Name, Last Name, Middle Initial to ensure that all relevant information is preserved for all records.
Note: When the data set opens, the validation for invalid fields will be turned on. If the data set contains catalog number they will be marked as invalid and highlighted in red, because Specify recognizes them as duplicates. The validation can be turned off by unchecking the Highlight Invalid Cells checkbox in the validation panel at the bottom of the work space.
![]()
Validation Panel
Note: The mapping of a data set created from a record set may not be edited.