Import Data Overview
The WorkBench can easily create a Data Set and import data from an MS Excel or CSV (comma separated value) file.
The WorkBench 'maps' the column headings from the import file to fields in the Specify 6 data model. This is not only necessary for other features in the WorkBench to function properly, but also ensures that the data will uploaded correctly into Specify 6. The WorkBench includes an 'auto-mapping' feature that reads the import column headings and attempts to automatically map them to any matching fields. Any ' unmapped' column headings can be manually mapped. The column headings could be mapped to different Specify fields at any later stage by editing the Data Set Mapping.
The Data Set will display the imported column headings rather than the Specify fields, as these are more familiar.
If data exists on several scanned card images or field notes, it is very helpful to create a Data Set by importing the images.
The WorkBench can also import images as a batch and link scanned images to individual rows in a Data Set.
Import Images
The Import Images action creates a new Data Set, then reads in a group of images and links each one to its own record in the new Data Set. Each image can then be viewed while entering data into its linked record in the Data Set.
Notes:
- The 'Import Images' action is best used when entering data from scanned cards or field notes. Single, descriptive images can also be linked to existing Data Set records using the Image Window.
- The WorkBench automatically adds a column within the Data Set and names it 'Image'.
- The 'Image' column is only displayed with the Image Window is open.
The WorkBench links images in jpeg, jpg, gif and png formats.
Click the 'Import Images' action, a file dialog will appear that allows multiple images to be selected. Select the images to import and click 'Open'.
Next, choose to reuse a Data Set map from an existing Data Set or create a new one:

Data Set Column Headings
To copy a Data Set map from an existing Data Set, select the 'Use an existing Data Set mapping' button and choose the Data Set from the list provided. The Data Set Properties dialog will then open to name and describe the new Data Set.
To choose new column headings to create a map for the Data Set, select the 'Create new Data Set mapping' button and click 'OK':

Data Set Mapping Editor
The Data Set Mapping Editor allows columns to be mapped, unmapped and reordered using the following buttons:
| Icon | Name | Result |
| map | Adds the field to the column list. | |
| unmap | Removes the field from the list of columns. | |
| reorder up | Moves the selected field up. | |
| reorder down | Moves the selected field down. |
The WorkBench provides a list of fields matching the Specify data model to use as column headings in the new Data Set. The list is organized by Data Types.
To add a column heading:
- Select a Data Type, the available fields will appear in the 'Specify Fields' window.
- Select a field.
- Click the
 (map) button.
 - The new column heading will appear under both Data Set Columns and Specify Fields(as shown below).
A ![]() (link) icon confirmes that the Specify field is mapped to the Data Set column.
(link) icon confirmes that the Specify field is mapped to the Data Set column.
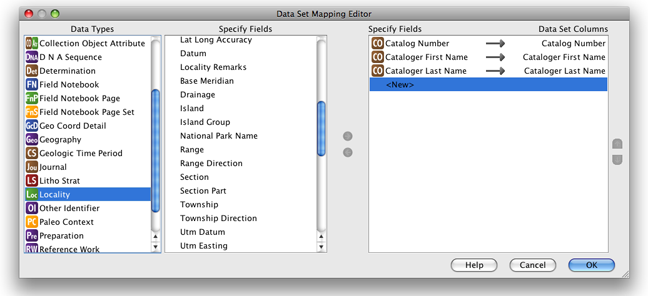
Data Set Mapping Editor with one column added
Continue adding fields/columns until the 'Data Set Columns' list is complete, then click 'OK'.
Complete the import process by naming and describing the new Data Set:

Data Set Properties
To edit the Data Set Mapping, see Edit Data Set Mapping.
Importing Data from an MS Excel file
The WorkBench can easily import data from an MS Excel file into a new Data Set.
The WorkBench uses HSSF as the port for the Microsoft Excel 97(-2003) file format (BIFF8) to pure Java, which supports read and write capability. (Support for Excel 2007 .xlsx files is in progress). Please see the HSSF project page for more information.
Notes:
- Changes made to the data in the WorkBench will not be reflected in the original MS Excel file.
- The WorkBench has a 4000 row maximum. Files that include more than 4000 rows will not import.
- Excel files that contain more than 4000 rows can be split using the Specify File Splitter tool.
To begin, click on the Import Data action on the side bar and choose the import file in the file dialog.
To properly import the data from an MS Excel file, the WorkBench must first determine if the data includes column headings. The following information dialog appears after the file dialog:
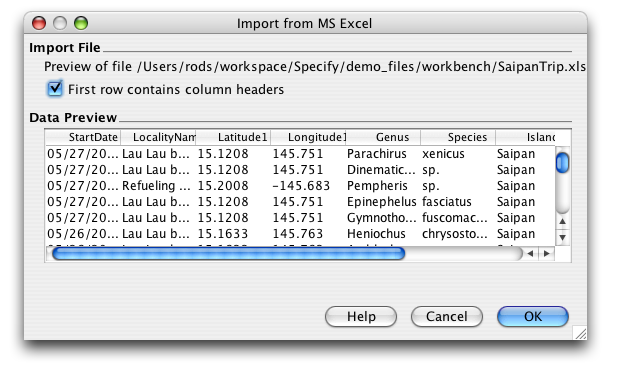
Import from MS Excel
The Data Preview window reads and displays a sample of the column headings and data from the import file. If the file does not contain column headings, the columns will be labelled in numerical order (Column 1, Column 2, etc.). Check the 'First row contains column headings' box according to how the file displays in the Data Preview window.
The next step in the import process is to 'map' the column headings from the import file to the fields in the Specify data model.
File includes Column Headings
The Workbench includes an 'auto-mapping' feature which first identifies column headings and compares them to existing Data Sets. If the column headings in the import file match those in an existing Data Set the following dialog will open:
New Data Set Column Headings
To reuse the 'map' from an existing Data Set select the 'Use an existing Data Set mapping' button and choose the Data Set from the list provided. The Data Set Properties dialog will then open, to name and describe the new Data Set.
To create a new map for the Data Set select the 'Create new Data Set mapping' button and click 'OK'.
Note: Mappings can only be reused if the XLS file being imported contains the same or fewer columns than the mapping. In other words, if you split an XLS file into two smaller files for import, then import the first XLS file but do not map all the columns, the unmapped columns are discarded. When you then import the second XLS file you will NOT be given the option to reuse the mapping created for the first XLS file. To reuse the mapping you must first delete the unmapped/discarded columns from the XLS file before importing it into the WorkBench.
The 'auto-mapper' then compares the imported column headings to the Specify fields and 'maps' the columns to matching fields.

Column Headings Auto-mapped in the Data Set Mapping Editor
The column headings from the import file appear under 'Data Set Columns' on the right side of the dialog and are mapped to 'Specify Fields' on the left.
Column headings that map to Specify fields display a ![]() (linked) icon.
(linked) icon.
Column headings that have not been automapped will have 'To Be Discarded' displayed under 'Specify Fields'. Unmapped column headings will be deleted if they are not mapped to a Specify field before clicking 'OK'.
The buttons in the dialog enable columns to be mapped, unmapped, added, deleted and reordered.
| Icon | Name | Result |
| Map | Adds the field to the column list. | |
| Unmap | Removes the field from the list of columns. | |
| Reorder up | Moves the selected field up. | |
| Reorder down | Moves the selected field down. |
To map an unmapped Data Set column to a Specify field:
- Click on the column in the right hand window to select it.
- Click on the Data Type to display the associated fields in the 'Specify Fields' window.
- Click on the required Specify field to select it.
- Click the (map) button.
To unmap a column from a field:
- Click on the column in the right hand window to select it.
- Click the
 (unmap) button.
To add a column
- Click on the Data Type to show the Specify fields in the 'Fields' window.
- Click on the Specify field.
- Click the (map) button.
A ![]() (link) icon confirms that the column and field are the same heading.
(link) icon confirms that the column and field are the same heading.
Note: A field may only map once. Specify fields that are mapped display a green check mark next to their name in the Specify field list confirming that they are in use.
Note: When importing Taxon information only use the Taxon Only Table in the mapping editor.
Note: The Agent table in the mapping editor may only be used for agent information. When uploading agent information along with collection object information use the Cataloger Title, First Name, Middle Name and Last Name fields in the Collection Object table.
When all the Columns are mapped and ordered correctly click the 'OK' button.
Complete the import process by naming and describing the new Data Set:
Data Set Properties
File does NOT include Column Headings
Import files that do not contain column headings can not be 'auto-mapped' to fields in Specify. Columns are labelled according to their numerical order and need to be manually mapped.

Map of Import File with No Column Headings
Columns that do not include headings display 'To Be Discarded' rather than mapping to Specify fields. Unmapped column headings will be deleted if they are not mapped to a Specify field before clicking 'OK'.
The buttons in the dialog enable columns to be mapped, unmapped, added, deleted and reordered . The function of each button is described below:
| Map | Adds the field to the column list. | |
| Unmap | Removes the field from the list of columns. | |
| Reorder up | Moves the selected field up. | |
| Reorder down | Moves the selected field down. |
To map an unmapped Data Set column to a Specify field:
- Click on the column in the right hand window to select it.
- Click on the Data Type to display the associated fields in the 'Specify Fields' window.
- Click on the required Specify field to select it.
- Click the (map) button.
To unmap a column from a field:
- Click on the column in the right hand window to select it.
- Click the (unmap) button.
To add a column
- Click on the Data Type to show the Specify fields in the 'Fields' window.
- Click on the Specify field.
- Click the (map) button.
A ![]() (link) icon will appear identifying that the column and field are the same heading.
(link) icon will appear identifying that the column and field are the same heading.
Note: A field may only map once. Specify fields that are mapped display a green check mark next to their name in the Specify field list confirming that they are in use.
Note: When importing Taxon information only use the Taxon Only Table in the mapping editor.
Note: The Agent table in the mapping editor may only be used for agent information. When uploading agent information along with collection object information use the Cataloger Title, First Name, Middle Name and Last Name fields in the Collection Object table.
When all the columns are mapped and ordered correctly click the 'OK' button.
Complete the import process by naming and describing the new Data Set:
Data Set Properties
To rename columns headings see Form Editing.
Note: When the data set opens the validation for invalid fields will be turned on. The validation can be turned off by unchecking the Highlight Invalid Cells checkbox in the validation panel at the bottom of the work space.
![]()
Validation Panel
Bad Imports
MS Excel files that are corrupt or have not been saved correctly will not import correctly into the WorkBench. A bad file may appear in the Data Set Mapping Editor with partial or no column headings, or display a warning at the bottom of the WorkBench window:

File Warning