New Data Set
The first step in creating a new Data Set is to select the columns that will be included in the new Data Set. This is achieved by either reusing the column headings from an existing Data Set or creating one from the list of fields available in Specify.
If a Data Set exists with the same column headings, or mapping, needed for the new Data Set, simply drag the Data Set item onto the New Data Set action on the side bar. This eliminates the need to choose a Data Set from a file dialog.
Notes:
- Data Sets have a limit of 4,000 records.
- Data Sets that are open in the work space are disabled in the side bar. To copy the column headings from an existing Data Set it must first be closed.
To bypass the drag and drop feature, click the ![]() New Data Set button on the side bar. The following dialog will appear:
New Data Set button on the side bar. The following dialog will appear:

New Data Set
To copy a Data Set map from an existing Data Set select the Use an existing Data Set mapping button and choose the Data Set from the list provided. The Data Set Properties dialog will then open, to name and describe the new Data Set.
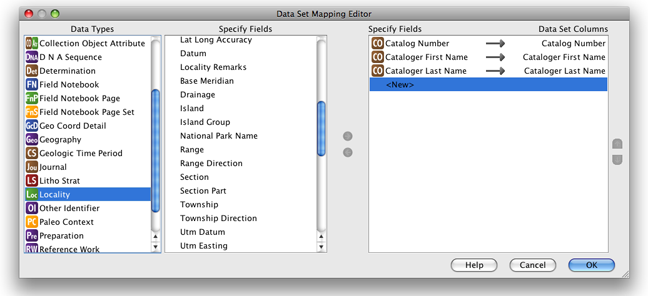
To choose column headings for the new Data Set, select the Create new Data Set mapping button and click 'OK'. The Data Set Mapping Editor will appear:

Data Set Mapping Editor
The Data Set Mapping Editor allows columns to be mapped, unmapped and reordered using the following buttons:
| Map | Adds the field to the column list. | |
| Unmap | Removes the field from the list of columns. | |
| Reorder up | Moves the selected field up. | |
| Reorder down | Moves the selected field down. |
The WorkBench provides a list of fields matching the Specify data model to use as column headings in the new Data Set. The list is organized by Data Types.
To add a column heading:
- Select a Data Type, the available fields will appear in the 'Specify Fields' window.
- Select a field
- Click the
 (map) button
The new column heading will appear under both 'Specify Fields' and 'Data Set Columns' (as shown below).
A link icon, (![]() ), icon confirms that the Specify field is mapped to the Data Set column.
), icon confirms that the Specify field is mapped to the Data Set column.
Note: A field may only map once. Specify fields that are mapped display a green check mark next to their name in the Specify field list confirming that they are in use.
Note: When importing Taxon information only use the Taxon Only Table in the mapping editor.
Note: The Agent table in the mapping editor may only be used for agent information. When uploading agent information along with collection object information use the Cataloger Title, First Name, Middle Name and Last Name fields in the Collection Object table.
Data Set Mapping Editor with one column added
Continue adding fields/columns until the 'Data Set Columns' list is complete, then click 'OK'.
Complete the new Data Set by naming and describing it:

Data Set Properties