Editing Table Formats and Aggregation
See our webinar on this topic:
Table formats determine what fields to display and the order of those fields for a specific table in query results, exports, and query combo boxes. For example, in the Agent table if you want Agents’ names to show up as ‘last name, first name’.
Table aggregation determines how multiple tables will be consolidated in query results and table formats. For example, a collecting event may have more than one collector, so aggregating the collector table would establish how the collectors would appear.
Accessing Table Formats and Aggregations
There are two ways to get to table formats and table aggregations
-
Navigate to the User Tools menu, then go to Schema Config
- Next, choose whatever table you want to create the table format/aggregation for and then you can select from the picklist or click the
 if there is already one made or click on the
  by either table format or table aggregation to make a new one
- Next, choose whatever table you want to create the table format/aggregation for and then you can select from the picklist or click the
-
Navigate to the User Tools menu, then go to App Resources
- From here, you want to make sure you can see App Resources (by clicking the big App Resources button at the top of the page), then navigate to the
Record Formatters(DataObjFormatters) file that applies to your current discipline or collection. In this case, I am editing the file under the Ichthyology collection.
- From here, you want to make sure you can see App Resources (by clicking the big App Resources button at the top of the page), then navigate to the


Note: If you do not have this file then you will have to add it to any rank in the App Resource Hierarchy. At your chosen level, click
App Resource → Record Formatters
Table Formats
Conditional Formatter
At the top of the form, there is a checkbox for a Conditional Formatter. What this does is allow for a field to show up in only some conditions and not all. First, you will choose what field you want the table format to be set to and then you can select the conditions.
In this example, the conditional format is current so the conditions are true or false. At the end under the preview, you can see that if the determination is current it has the fields and separators that are under the ‘true’ condition and if it is not current it has the field that is under the ‘false’ condition.
Customization
Let’s go through an example using the Address format:

Field
If you click on Add Field you will add another field with a blank separator box and a field picklist. You’ll want to select the field(s) you will want to show up for the table. If you have more than one field you can use the arrows on the right to move any of these fields up or down to reorder them and you can delete any unwanted fields by clicking ![]() .
.
Separator
Under the separator section you can also choose how you want the fields to be separated, this can be anything you want. In the screenshot above you can see there’s a comma for City and State whereas Address2 and Postal Code have a space.
Field Formatters
Below the fields on the right is a Customize Field Formats checkbox, when checked you can choose from a picklist if you want a customized format for any of the fields.

Configure Field
In between the field and the delete button there is a gear to configure the field, when pressed this opens up a “Trim Leading Zeros” checkbox. This is unchecked by default and when checked it will remove any leading zeros from a numerical field.
Unchecked:
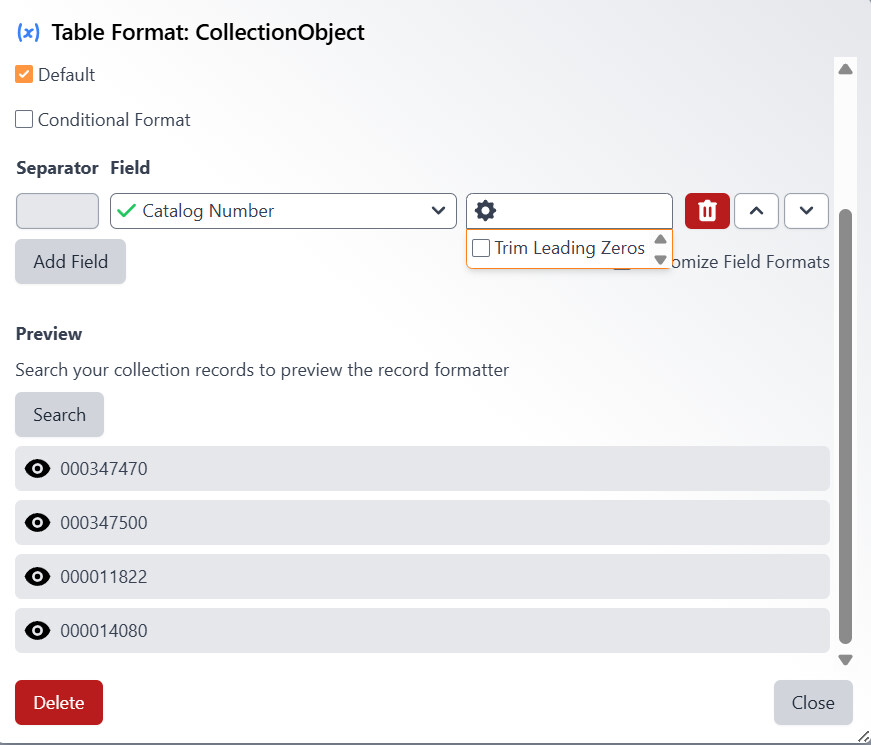
Checked:

Preview
Once you have all the fields you want you can scroll down to see what a preview looks like. From there you can decide if you want to change anything based on how it looks. You can also click on the eyeball to see the specific record or Search where you can use the query builder to search for records.
Table Aggregation
In the aggregation section, you have all of the table aggregations that you can apply to a table/field in queries and on forms.
Customization
In the table aggregation, you can customize the separator, suffix, limit, table format, and how you want it to be sorted.

Separator
The separator here works the same as it does in table formats. You can add anything from a comma to a space, or you could put a word if you want.
Suffix
The suffix is whatever you want to appear at the end of the text string.

Limit
The limit is how many table records you want to be returned. If you create a new aggregation the limit will be set to zero which means the maximum amount of results available will be returned but you can change this number to whatever you want.
Table Format
The Table format section is for when you have multiple table formats that could apply to the aggregation. For example, if you have two different determination table formats you can select which table format you want the aggregation to apply to.

Sort Field
This is just how you want the table records to be sorted. There’s a picklist of the different fields you can select and you can scroll down to see different tables and hidden fields.
In this case, I sorted the determination by current and you can see the current taxon at the end.

Example
For example, let’s consider the Collector table:
In the Table Format section the Collector is defined by Agent with ‘last name, first name’. There can be multiple collectors for one collection object so under Aggregation you can define how you want to separate each collector and if you want any suffix at the end.
In this video, I created a collecting event that had 4 collectors. The original aggregation had no separator between each of the collectors, so I went back and added a | for the separator. This way each agent will show up as ‘last name, first name’ and have the | at the end to separate them so it is very clear whose name is whose.


