This guide introduces the Form Meta Menu, accessed via the gear icon (
) in the top-right corner of any data entry form. It covers how users can modify form views, enable or disable auto-numbering, and use Carry Forward settings to preserve specific data between records. The documentation also covers administrative tools such as audit log, merging duplicate records, and Read-Only mode.
The Form Meta Menu can be accessed by clicking on the ![]() icon in the top right of any form. This is always present in the title bar of the form as seen below:
icon in the top right of any form. This is always present in the title bar of the form as seen below:

As well as on subforms:

And can be accessed from the grid view when the content is expanded in the bottom right of each item:


The new menu introduces support for capabilities such as:
- Configuring carry forward on a field-by-field basis
- Enable or disable auto-numbering
- Customizing Form type (autogenerated or predefined)
- Inspecting the edit history of a record
- Querying on tree usages
- Querying on pick list usages
- Forms can now be switched temporarily to read-only mode
- Setting subview sort order
- Switching subviews between grid or subform display format
- Opening the Form definition
- Copying a link to a Collection Object record
- Field labels can be disabled temporarily, displaying the database field names instead
- The ability to run a report/label for a given record on any table
- Record merging
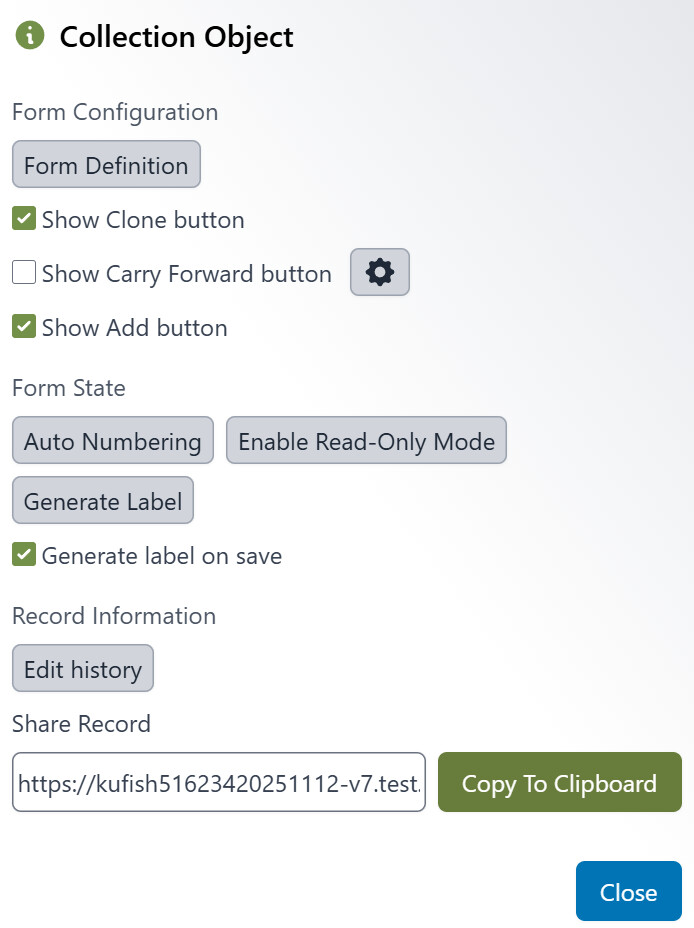
To access this menu, you just need to click the ![]() . As a primary example, here is how the form meta menu appears on the Collection Object table:
. As a primary example, here is how the form meta menu appears on the Collection Object table:
Entire Tables
Form Configuration
Form Definition

Use Auto Generated Form
The Form Definition menu contains several useful options. You can check the “Use Auto Generated Form” box to enable Specify’s built-in form generator.
This automatically generated form will display every field in the table that is unhidden in the schema config menu. It will represent most relationships as buttons.
Use localized field labels
By unchecking the “Use localized field labels” box, you can force Specify to show the database names for the fields rather than the names established in the schema config menu.
For example:
With localized fields enabled:

With localized fields disabled:
Edit Form Definition
This link will take you to the visual editor for the form’s view definition in App Resources. You can make changes to the view definition, save them, and clear your cache to see them reflected on the form.
Clone
![]()
Checking the Show Clone Button will make a clone button appear in the bottom right of the form. When a record is saved this button can be pressed and it will make an exact copy of the record.
Carry Forward
![]()
You can enable or disable the Carry Forward button by checking the box to the left. If you click on the gear, you can customize all of the options contained within!
Carry forward allows you to configure the clone behavior on a per-field basis. You can select fields (that are not enforced unique) that you wish to preserve when using the Carry Forward functionality in Specify. This extends to entire relationships.

You can Select All or Deselect All fields in the base table using the action buttons at the bottom of the dialog. You can also reveal hidden fields by selecting the checkbox above the action buttons. By default, all fields are selected for carry forward.
To see the behavior in action, you can dismiss the dialog and click Carry Forward.
Bulk Carry Forward
Add
![]()
Checking this will put an add button in the bottom right which after saving the record will allow you to add another blank record under the same table. For example, if you created a record under the collection object table and then pressed the add button it would add a blank collection object record.
Auto Numbering
You can now configure Auto Numbering on a per-field basis. In this instance, only the catalog number is auto numbering in this form.

If I uncheck this box, I am able to enter any catalog number I would like without having Specify enforce auto numbering. I can later turn it back on and resume auto numbering.
Enable Read-Only Mode
Once the form reloads, you will see a read-only view of your records. This will persist until it is disabled from the configuration menu, ensuring that you don’t make any unintended changes to your data. This mode applies everywhere, including in the WorkBench and trees. It is the equivalent of temporarily becoming a user without any edit, create, or delete privileges. Here is an example of a Collection Object record with read-only mode enabled:

Generate Label
This button functions the same as the “Generate Invoice” or “Generate Label” buttons already available on forms. This extends the capability to run a report or label to any table in the database.
Generate label on save
This checkbox allows you to be prompted every time you save a record within the specific table.
Record Information

Edit History
This button creates an audit log query for the specific record. This allows you to see when a record has been modified and by whom. It includes the Table Name, Record ID, Action, Modified By Agent, Timestamp Modified, Parent Record ID, and Parent Table Name.
Merge Records
This button allows you to merge records from within a data entry form. It can be found in the following tables:
- Agent
- Locality
- Collecting Event (Shared)
- Paleo Context (Shared)
Records can be selected using the Search form or the Query Builder. These records can then be merged with the one you are currently viewing. See our documentation on Record Merging for more information.
Share Record
![]()
This feature allows you to easily share a link of the current record to anyone with access to the Specify database.
[!tip]
For collection object records in particular, it leverages the/bycatalog/feature in Specify 7!You can see your Specify URL followed by
/bycatalog/KUI/000019254
KUIis the collection code
00019254is the catalog number
Subviews
For subviews, there are special options available.
By clicking the gear icon next to a subview you can see that there are new options under Subview.

Subview Configuration
Type
This allows you to switch the display type for the subview between Grid and Subform. The default type can also be set in the subview form definition.


Order By
This allows you to choose which field to order the subview by. This can be defined in the form definition, or chosen manually in the form meta menu.
This list of fields is repeated and can be sorted to be ascending or descending.

Tree Items and Pick Lists

When viewing a tree item or pick list form, there is a new Find Usages button that displays.
For tree items, this button runs the same query as the Query (![]() ) function does in the tree viewer. It automatically runs a query in a new tab and finds all collection object records that reference that record.
) function does in the tree viewer. It automatically runs a query in a new tab and finds all collection object records that reference that record.
For pick list items, this button runs a query in a dialog that finds all table names and fields that use that particular pick list.

In this instance, the “Type Status” pick list is only being used in the determination table for the field TypeStatusName in this collection.